Contents
이번 분기 개인 및 파트 목표로 '테스트' 적용 및 생활화를 선정했다.
덕분에 시간이 없어서 등록만 해두고 듣지 못했던
'더 자바, 애플리케이션을 테스트하는 다양한 방법'(백기선)
https://inf.run/fbHw 강좌를 수강하게 되었다.
더 자바, 애플리케이션을 테스트하는 다양한 방법 - 인프런 | 강의
자바 프로그래밍 언어를 사용하고 있거나 공부하고 있는 학생 또는 개발자라면 반드시 알아야 하는 애플리케이션을 테스트하는 다양한 방법을 학습합니다., - 강의 소개 | 인프런
www.inflearn.com
강의에서는 해당 내용들을 다루게 된다.
- Junit5 : 자바 개발 테스트용 프레임워크
- Mockito : 테스트 코드의 의존성을 가짜로 만들어 테스트
- Docker : 테스트를 유용하게 하는 Test containers를 활용
- JMeter : 성능 태스트.
- Chaos Monkey : 운영 이슈를 로컬에서 재현하는 방법
- ArchUnit : 어플리케이션 아키텍처 테스트
1. JUnit5 소개
- 자바 개발자가 가장 많이 사용하는 테스트용 프레임워크
- 스프링 부트 2.2로 오르면서 JUnit5로 버젼업 됨.
1) Junit4와의 차이점
- Junit4는 하나의 Jar파일 디펜던시로 들어오는 형태였는데, Junit5는 그 자체로 모듈화가 되어있음.
(1) 구성
3개 세부 모듈, Junit5는 Junit Platform 위에 Jupiter, Vintage가 올라감.
- Junit Platform : 실행 런처 제공. 콘솔, main 안, 툴 내 코드에서도 실행이 가능함. TestEngine API 제공
- Jupiter: TestEngine API 구현체 (JUnit 5를 제공)
- Vintage: TestEngine API 구현체 (JUnit 4와 3을 지원)
2) 기초 예제
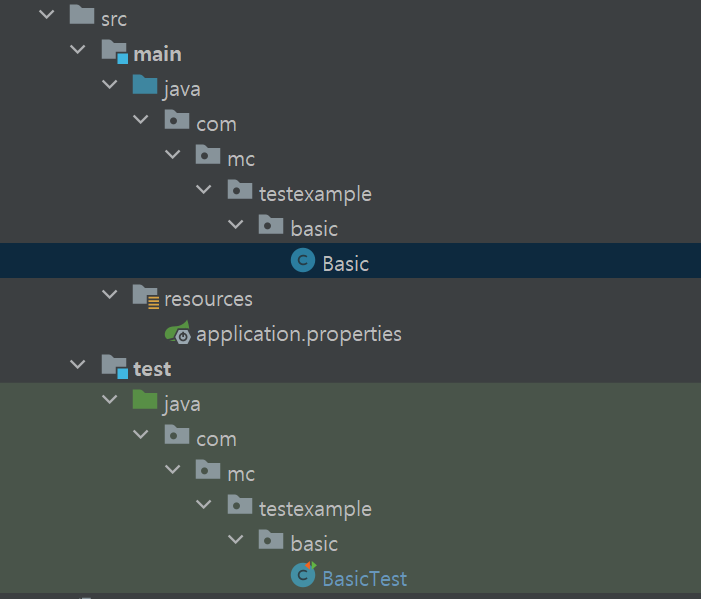
(1) 우선 SpringBoot 프로젝트를 만든다.
최신 버젼을 사용해서 스프링부트 3.0.6을 사용했는데, 이때는 java 17버젼이 필요.
plugins {
    id 'java'
    id 'org.springframework.boot' version '3.0.6' // 2023-05-18. java 17 필요.
    id 'io.spring.dependency-management' version '1.1.0'
}

group = 'com.mc.testexample'
version = '0.0.1-SNAPSHOT'
sourceCompatibility = '17'

repositories {
    mavenCentral()
}

dependencies {
    implementation 'org.springframework.boot:spring-boot-starter' // 스프링 부트 2.2부터 Junit5으로 탑재됨. (기존은 4)
    testImplementation 'org.springframework.boot:spring-boot-starter-test'
}

tasks.named('test') {
    useJUnitPlatform()
}
만약 스프링 부트를 사용하지 않는다면, 아래와 같이 디펜던시를 추가해준다.
<dependency>
    <groupId>org.junit.jupiter</groupId>
    <artifactId>junit-jupiter-engine</artifactId>
    <version>5.5.2</version>
    <scope>test</scope>
</dependency>
dependencies {
implementation 'org.springframework.boot:spring-boot-starter' // 스프링 부트 2.2부터 Junit5으로 탑재됨. (기존은 4)
testImplementation 'org.springframework.boot:spring-boot-starter-test'
}
(2) 테스트 파일 만들기
스프링 부트 Main 파일을 써도 되고, 스프링 부트가 주가 되는 테스트는 아님으로 임의로 파일을 만들어도 된다.
public class Basic {
}
ctrl+shift+t : 테스트 파일 만들고 싶은 곳에서 단축키 누르면, test-java 패키지 안에 테스트 파일이 생긴다.
/**
* Public 필요 없음 : Junit5부터는 class나 method가 public일 필요 없음 (Junit4는 public이었어야함)
* - 자바 리플렉션 사용. 굳이 public 사용할 필요 없음
*/
class BasicTest {
@Test
void create1(){
Basic basic = new Basic();
assertNotNull(basic);
System.out.println("create1");
}
@Test
void create2(){
System.out.println("create2");
}
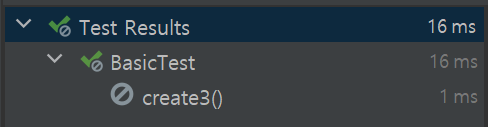
@Test
@Disabled // 테스트를 실행하지 않을 때(해당 소스가 Deprecated 된 경우). 자주 사용하지 않는 것이 좋음. Junit4의 @Ignored
void create3(){
System.out.println("create3");
}
/**
* 테스트를 실행하기 전에 딱 한번만 실행
* - static. 무조건 static void로 작성
* - private X, default O
* - return이 있으면 안됨.
*/
@BeforeAll // Junit4의 @BeforeClass
static void beforeAll(){
System.out.println("before all");
}
/**
* 테스트를 실행 후 딱 한번만 실행
* 조건 사항은 @BeforeAll과 같음
*/
@AfterAll // Junit4의 @AfterClass
static void afterAll(){
System.out.println("after all");
}
/**
* 모든 테스트 실행 전, 각각의 클래스와 메소드를 실행할 때 한번씩 실행.
* static일 필요 없음.
*/
@BeforeEach // Junit4의 @Before
void beforeEach(){
System.out.println("before each");
}
/**
* 모든 테스트 실행 후, 각각의 클래스와 메소드를 실행할 때 한번씩 실행.
* static일 필요 없음.
*/
@AfterEach // Junit4의 @After
void afterEach(){
System.out.println("after each");
}
}
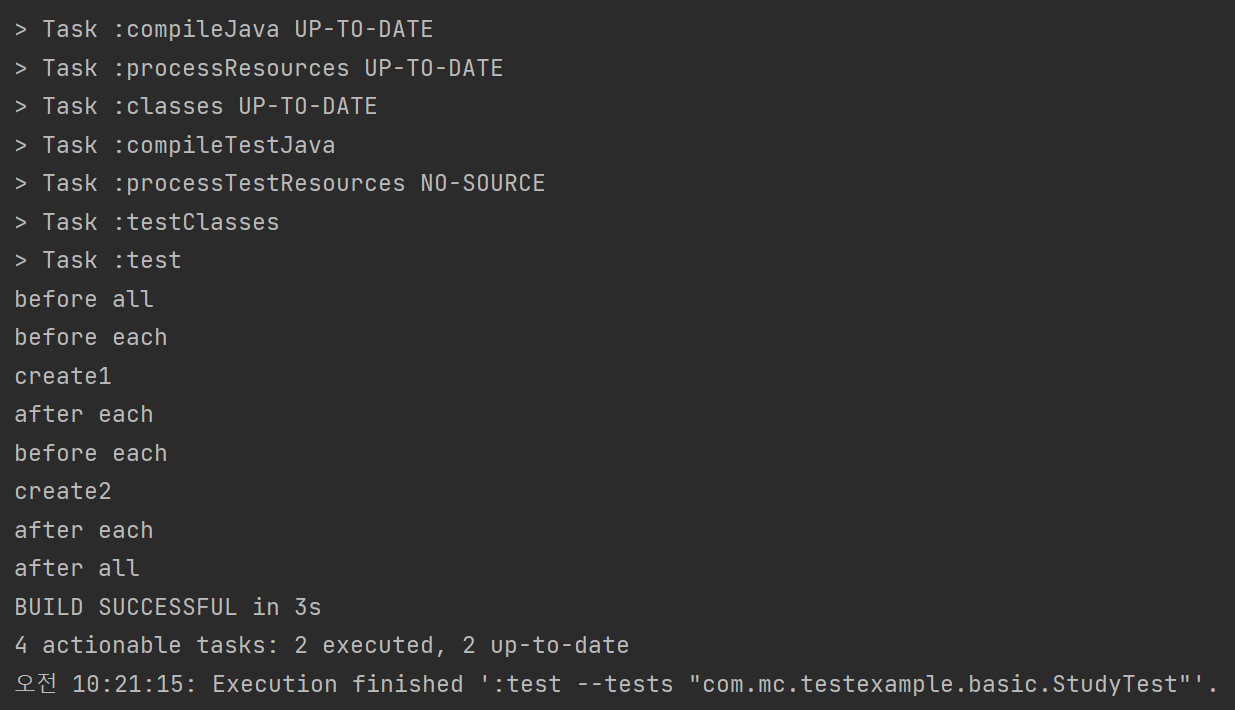
클래스 전부 테스트 결과
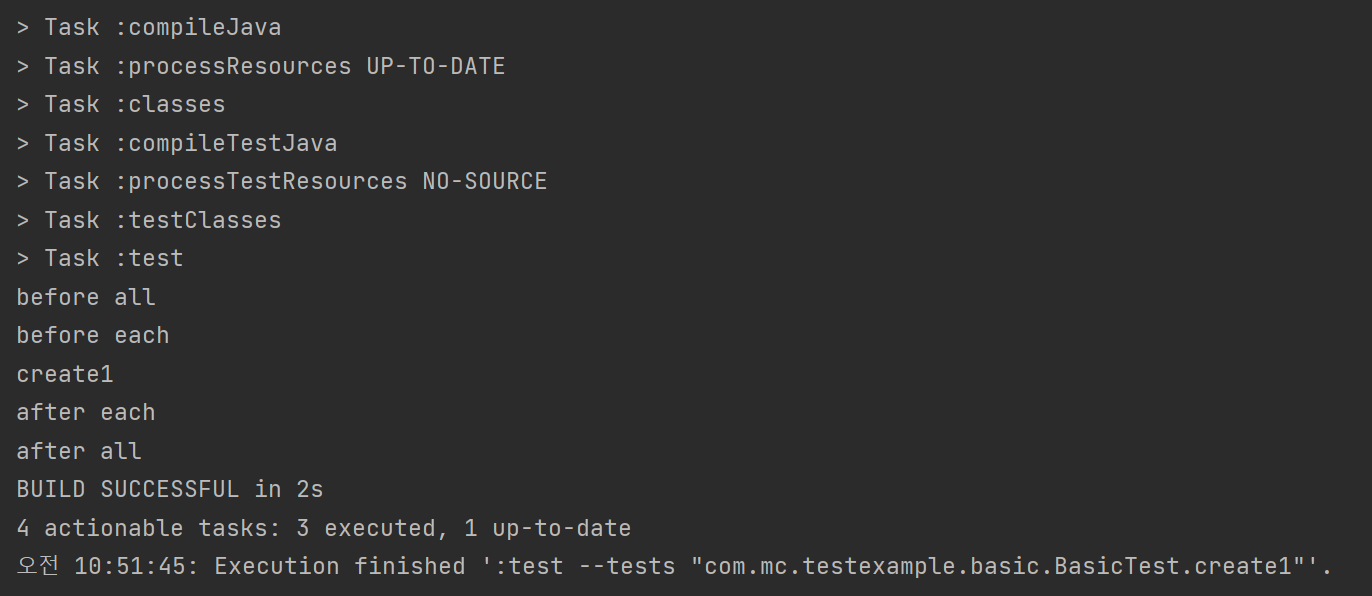
create1 메소드 실행결과
3) 테스트 이름 표기 방법
기본적으로 아래 테스트 메소드명이 표시되는데, Camel보다는 _를 쓰는 방식이 좀 더 편하다.
원하는 명으로 보여줄 때 @DisplayNameGeneration, @DisplayName를 사용한다.
(1) @DisplayNameGeneration
- Method와 Class에 사용.
- 테스트 이름을 표기하는 전략 선택
- 기본 구현체로 ReplaceUnderscores
@DisplayNameGeneration(DisplayNameGenerator.ReplaceUnderscores.class)
class BasicTest {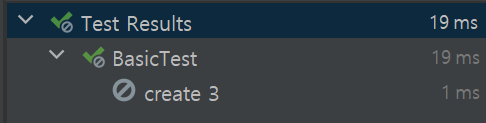
(2) @DisplayName
- 테스트 이름을 각각 지정.
- @DisplayNameGeneration 보다 우선 순위가 높다.
    @Test
    @DisplayName("생성 3")
    @Disabled // 테스트를 실행하지 않을 때(해당 소스가 Deprecated 된 경우). 자주 사용하지 않는 것이 좋음. Junit4의 @Ignored
    void create_3(){
        System.out.println("create3");
    }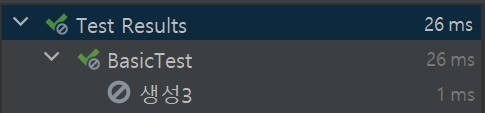
이 쪽이 테스트 네임을 더 상세하게 지정할 수 있어서 좋을 것 같다.
테스트 이름이 길어지면 알아보기도 쉽다.
IntellJ 콘솔에서 한글 깨짐이 문제는 아래로 해결했다.
https://maybechrisk.tistory.com/99
더 다양한 내용을 아래에 있다.
https://junit.org/junit5/docs/current/user-guide/#writing-tests-display-names
JUnit 5 User Guide
Although the JUnit Jupiter programming model and extension model do not support JUnit 4 features such as Rules and Runners natively, it is not expected that source code maintainers will need to update all of their existing tests, test extensions, and custo
junit.org
4) Assertion
나는 org.junit.jupiter.api.Assertions.* 전체를 import 해서 쓰면 편리하다.
- assertEqulas(expected, actual) : 실제 값이 기대한 값과 같은지 확인
- assertNotNull(actual) : 값이 null이 아닌지 확인
- assertTrue(boolean) : 다음 조건이 참(true)인지 확인
- assertAll(executables...) : 모든 확인 구문 확인
- assertThrows(expectedType, executable) : 예외 발생 확인
- assertTimeout(duration, executable) : 특정 시간 안에 실행이 완료되는지 확인
- 마지막 파라미터로 메시지를 표현할 수 있는데, String을 직접 줄 수도 있고, Supplier<String> 타입의 인스턴스를 람다형태로 전달할 수도 있다.
- 한 테스트에서 걸리면, 아래 테스트는 수행하지 않는다.
(1) assertEqulas(expected, actual)
기대값, 실제값, 메시지의 순서로 작성한다.
public class Robot {
    private RobotStatus status;

    public RobotStatus getStatus(){
        return this.status;
    }
}
public enum RobotStatus {
AWAITING, MOVING, STOPPED, ERROR
}로봇과 로봇 상태에 대한 클래스를 만들고
class RobotTest {

    @Test
    @DisplayName("로봇 초기상태 확인")
    void check_robot_init_status(){
        Robot robot = new Robot();
        assertEquals(RobotStatus.AWAITING, robot.getStatus(), "로봇 초기 상태는 무조건 Awaiting 이어야 합니다.");
    }
}
로봇 초기 상태를 확인할 수 있다. 이 때 로봇 초기 상태를 지정하지 않았기 때문에

아래처럼 결과가 나온다.
초기값을 아래와 같이 넣어주면
private RobotStatus status = RobotStatus.AWAITING;
성공 결과를 볼 수 있다.
이 때 메시지를 String으로 만들면 값을 조합할 경우, 테스트 성공여부와 상관없이 무조건 새로 생성하기 때문에
성능을 생각한다면 람다식 Supplier<String> 형태로 써주는 것이 좋다.
    @Test
    @DisplayName("로봇 초기상태 확인")
    void check_robot_init_status(){
        Robot robot = new Robot();

        // String : 테스트 성공여부와 상관없이 계속 String을 만듦.
        assertEquals(RobotStatus.AWAITING, robot.getStatus(), "로봇 초기 상태는 무조건 " + RobotStatus.AWAITING +"이어야 합니다.");

        // 람다식 : 필요할 때만 String을 만듦. (성능)
        assertEquals(RobotStatus.AWAITING, robot.getStatus(), () -> "로봇 초기 상태는 무조건" + RobotStatus.AWAITING +" 이어야 합니다.");

        // 에러 메시지를 만드는 방식이 복잡하면 Supplier<String>으로 작성, 간추리면 위와 같다.
        assertEquals(RobotStatus.AWAITING, robot.getStatus(), new Supplier<String>() {
            @Override
            public String get() {
                return "로봇 초기 상태는 무조건" + RobotStatus.AWAITING +" 이어야 합니다.";
            }
        });
    }
(2) assertNotNull(actual) : 값이 null이 아닌지 확인
(3) assertTrue(boolean) : 다음 조건이 참(true)인지 확인
@NoArgsConstructor
@Getter
public class Robot {
    private RobotStatus status = RobotStatus.AWAITING;
    private int timeout;

    public Robot(int timeout){
        this.timeout = timeout;
    }
}
Getter, Setter를 더 만들기 싫으므로, lombok을 추가하고 Robot 클래스를 수정했다.
@Test
@DisplayName("로봇 초기 타임아웃 값 확인")
void check_initial_time_out(){
    Robot robot = new Robot(3);
    assertTrue(robot.getTimeout() > 10, ()-> "로봇 타임 아웃값은 10보다 커야합니다.");
}
초기값을 3으로 해서 다시 돌려보면, 아래 결과를 얻을 수 있다.

(4) assertAll(executables...) : 모든 확인 구문 확인
- 한 테스트에서 걸리면, 아래 테스트는 수행하지 않는데, 모든 테스트를 수행하기 위해서는 assertAll을 쓴다.
@Test
@DisplayName("로봇 초기 전체값 확인")
void check_initial_values(){
    Robot robot = new Robot(3);
    assertAll(
            () -> assertNotNull(robot),
            () -> assertEquals(RobotStatus.AWAITING, robot.getStatus(), () -> "로봇 초기 상태는 무조건 " + RobotStatus.AWAITING +" 이어야 합니다."),
            () -> assertTrue(robot.getTimeout() > 10, ()-> "로봇 타임 아웃값은 10보다 커야합니다.")
    );
}
아래 2개 테스트를 실패가 나도록 했기 때문에 아래와 같은 결과를 얻을 수 있다.

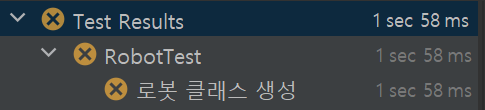
(5) assertThrows(expectedType, executable) : 예외 발생 확인
@NoArgsConstructor
@Getter
public class Robot {
    private RobotStatus status;
    private int timeout;

    public Robot(int timeout){
        if(timeout < 0) throw new IllegalArgumentException("timeout 설정값은 0보다 커야합니다.");
        this.timeout = timeout;
    }
}
타임아웃 설정값이 음수일 때 체크할 수 있는 방법으로, 생성자에서 음수가 들어오면 에러가 발생하도록 한다
    @Test
    @DisplayName("로봇 클래스 생성")
    void create_new_robot(){
        IllegalArgumentException exception =
                assertThrows(IllegalArgumentException.class, () -> new Robot(-10));
        assertEquals("timeout 설정값은 0보다 커야합니다.", exception.getMessage());
    }
Test 클래스에서 해당 에러가 발생하는 지 확인한다. 실제 에러가 발생했기 때문에 True로 떨어진다.
(왠지 에러를 만들었으니 에러가 나야할 것 같지만 조건을 명확히 확인할 것)
여기서는 일부러 검증하기 위해 assertEquals로 같은 에러 문구를 내는지 확인했다.
assertDoesNotThrow(()->new Robot(-10)),아니면 assertDoesNotThrow를 써서 에러와 에러 메시지를 직접 확인할 수도 있다.

(6) assertTimeout(duration, executable) : 특정 시간 안에 실행이 완료되는지 확인
assertTimeout(Duration.ofMillis(100), () -> {
                    new Robot(10);
                    Thread.sleep(1000);
})
실행 시 100ms 안에 실행되어야하는데 sleep을 1000을 주었다.

문제는 테스트는 해당 로직이 다 끝날 때까지 계속되어, 거의 2초가 걸리게 된다.
따라서 100ms가 되었을 때 바로 테스트가 종료되게 하려면, assertTimeoutPreemptievely (선점제한시간)를 걸어준다.
assertTimeoutPreemptively(Duration.ofMillis(100), () -> {
    new Robot(10);
    Thread.sleep(1000);
}
그러면 100ms가 넘었을때 바로 테스트가 종료되어 시간을 단축할 수 있다.
다만 코드블럭을 별도의 쓰레드에서 실행하기 때문에, ThreadLocal을 사용하는 코드가 있으면, 해당 코드 블럭이 예상치 못한 문제가 발생할 수 있다.
스프링 트랜잭션은 ThreadLocal을 기본 전략으로 하는데, 다른 Thread에서 공유되지 않기 때문에 롤백이 안되고 DB에 반영될 수 있어서 조심해서 사용한다.
* <h2>Preemptive Timeouts</h2>
*
* <p>The various {@code assertTimeoutPreemptively()} methods in this class
* execute the provided {@code executable} or {@code supplier} in a different
* thread than that of the calling code. This behavior can lead to undesirable
* side effects if the code that is executed within the {@code executable} or
* {@code supplier} relies on {@link ThreadLocal} storage.
*
* <p>One common example of this is the transactional testing support in the Spring
* Framework. Specifically, Spring's testing support binds transaction state to
* the current thread (via a {@code ThreadLocal}) before a test method is invoked.
* Consequently, if an {@code executable} or {@code supplier} provided to
* {@code assertTimeoutPreemptively()} invokes Spring-managed components that
* participate in transactions, any actions taken by those components will not be
* rolled back with the test-managed transaction. On the contrary, such actions
* will be committed to the persistent store (e.g., relational database) even
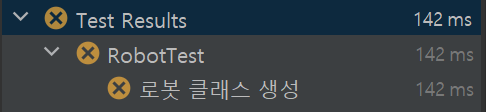
* though the test-managed transaction is rolled back. @Test
@DisplayName("로봇 클래스 생성")
void create_new_robot() {
Robot robot = new Robot(3);
assertAll(
// () -> {
// IllegalArgumentException exception =
// assertThrows(IllegalArgumentException.class, () -> new Robot(-10));
// assertEquals("timeout 설정값은 0보다 커야합니다.", exception.getMessage());
// },
() -> assertDoesNotThrow(() -> new Robot(-10)),
() -> assertNotNull(robot),
() -> assertTimeoutPreemptively(Duration.ofMillis(100), () -> {
new Robot(10);
Thread.sleep(1000);
}),
() -> assertEquals(RobotStatus.AWAITING, robot.getStatus(), () -> "로봇 초기 상태는 무조건 " + RobotStatus.AWAITING + " 이어야 합니다."),
() -> assertTrue(robot.getTimeout() > 10, () -> "로봇 타임 아웃값은 10보다 커야합니다.")
);
}
AssertJ, Hemcrest, Truth 등의 라이브러리를 사용할 수도 있는데,
Jupiter와 비슷하지만 원하는 것을 쓰면 된다. (AssertJ, Hemcrest도 기본 제공됨)
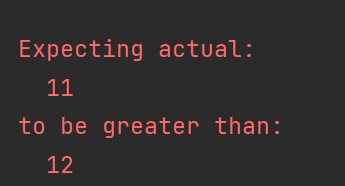
@Test
@DisplayName("AssertJ 예제")
void create_new_robot_with_assertJ() {
    Robot robot = new Robot(11);
    assertThat(robot.getTimeout()).isGreaterThan(12);
}
출처 : '더 자바, 애플리케이션을 테스트하는 다양한 방법'(백기선), 자료&1~5강
'Java & Spring' 카테고리의 다른 글
| [Java Test] 2. Mockito (0) | 2023.05.22 |
|---|---|
| [Java Test] 1. JUnit5 (4) properties, 확장, 마이그레이션 (0) | 2023.05.22 |
| [Java Test] 1. JUnit5 (3) 테스트 인스턴스 & 순서 지정 (0) | 2023.05.19 |
| [Java Test] 1. JUnit5 (2) 테스트 필터링, 테스트 반복 (1) | 2023.05.19 |
| [DDD] 도메인 주도 개발 - (3) 리포지토리 & 모델 구현 (0) | 2023.02.21 |
| [DDD] 도메인 주도 개발 - (2) 애그리거트 (0) | 2023.02.21 |
| [DDD] 도메인 주도 개발 - (1) 좋은 아키텍처와 도메인 주도 설계 (0) | 2023.01.11 |
| [Spring Legacy] 설명 (0) | 2021.01.27 |


